Hyperledger Fabric 1.4 kafka排序服务原理与安装
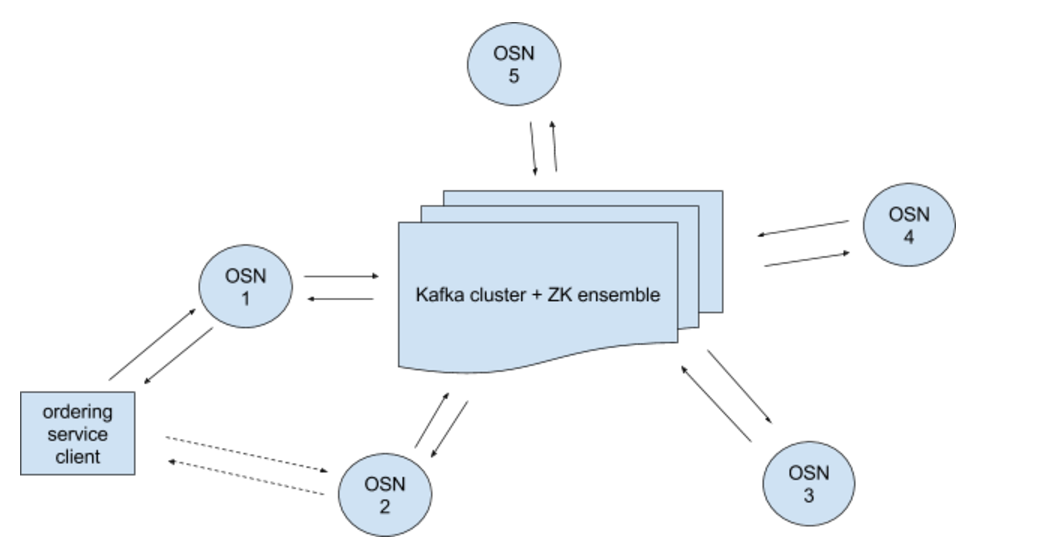
1.Kafka排序服务原理
官方文档在google doc上, 参考翻译 https://www.jianshu.com/p/db006359133d
2. kafka 排序服务安装
所有的代码已分享在https://github.com/zealzeng/kafka-orderer-demo
2.1 安装环境
官方文档有一些简单的描述 https://hyperledger-fabric.readthedocs.io/en/release-1.4/kafka.html kafka节点需要3f+1, 最少需要4个节点; zookeeper节点2f+1, 最少需要3个节点; 资源有限, orderer和peer最好分开,kafka和zookeeper一台问题不大。
| IP | 服务 |
|---|---|
| 192.168.31.86 | zk1,kafka1,orderer1.example.com,peer0.org1.example.com |
| 192.168.31.168 | zk2,kafka2,orderer2.example.com,peer1.org1.example.com |
| 192.168.31.121 | zk3,kafka3,orderer3.example.com,peer0.org2.example.com |
| 192.168.31.231 | kafka4,peer1.org2.example.com |
Hyperledger fabric 1.4年前已正式发布, 是一个长期维护的版本, 适合用于生产环境。orderer开发可以设为solo, 生产就最好用kafka了。
2.2 生成密钥,证书,docker compose文件
(1)配置crypto-config.yaml
以first-network的模板做调整, 一些关键配置
OrdererOrgs:
  # ---------------------------------------------------------------------------
  # Orderer
  # ---------------------------------------------------------------------------
  - Name: Orderer
    Domain: example.com
    # ---------------------------------------------------------------------------
    # "Specs" - See PeerOrgs below for complete description
    # ---------------------------------------------------------------------------
    Specs:
      - Hostname: orderer1
      - Hostname: orderer2
      - Hostname: orderer3
orderer组织配置三个节点. peer的组织默认还是Org1和Org2.
(2)配置configtx.yaml
修改ordererType为kafka, 增加三个orderer节点地址, 四个kafka broker节点, 这里统一使用域名或机器名, 需要修改docker container的/etc/hosts做ip映射
Orderer: &OrdererDefaults

    # Orderer Type: The orderer implementation to start
    # Available types are "solo" and "kafka"
    OrdererType: kafka

    Addresses:
        - orderer1.example.com:7050
        - orderer2.example.com:7050
        - orderer3.example.com:7050

    # Batch Timeout: The amount of time to wait before creating a batch
    BatchTimeout: 2s

    # Batch Size: Controls the number of messages batched into a block
    BatchSize:

        # Max Message Count: The maximum number of messages to permit in a batch
        MaxMessageCount: 10

        # Absolute Max Bytes: The absolute maximum number of bytes allowed for
        # the serialized messages in a batch.
        AbsoluteMaxBytes: 99 MB

        # Preferred Max Bytes: The preferred maximum number of bytes allowed for
        # the serialized messages in a batch. A message larger than the preferred
        # max bytes will result in a batch larger than preferred max bytes.
        PreferredMaxBytes: 512 KB

    Kafka:
        # Brokers: A list of Kafka brokers to which the orderer connects
        # NOTE: Use IP:port notation
        Brokers:
            - kafka1:9092
            - kafka2:9092
            - kafka3:9092
            - kafka4:9092
(3)生成密钥,证书,创始块, 通道, 锚节点更新文件等
cryptogen generate --config=./crypto-config.yaml
mkdir channel-artifacts
configtxgen -profile TwoOrgsOrdererGenesis -outputBlock ./channel-artifacts/genesis.block
configtxgen -profile TwoOrgsChannel -outputCreateChannelTx ./channel-artifacts/channel.tx -channelID mychannel
configtxgen -profile TwoOrgsChannel -outputAnchorPeersUpdate ./channel-artifacts/Org1MSPanchors.tx -channelID mychannel -asOrg Org1MSP
configtxgen -profile TwoOrgsChannel -outputAnchorPeersUpdate ./channel-artifacts/Org2MSPanchors.tx -channelID mychannel -asOrg Org2MSP
从86的机器拷贝到其它机器
scp -r channel-artifacts crypto-config root@192.168.31.168:/mnt/sda3/fabric-samples/kafka-orderer
scp -r channel-artifacts crypto-config root@192.168.31.121:/mnt/sda3/fabric-samples/kafka-orderer
scp -r channel-artifacts crypto-config root@192.168.31.231:/mnt/sda3/fabric-samples/kafka-orderer
(4)编辑zookeeper节点对应文件
以zk1节点为例, 编辑docker-compose-zk1.yaml, 名字ID等都配置成唯一, 2181端口用于客户端连接, 2888和3888应该是内部leader选举和通信使用, 具体参考zookeeper文档。 extra_hosts在容器环境配置上域名和ip映射, 会写到容器的/etc/hosts
version: '2'

services:
  zk1:
    container_name: zk1
    hostname: zk1
    image: hyperledger/fabric-zookeeper:0.4.14
    restart: always
    environment:
      - ZOO_MY_ID=1
      - ZOO_SERVERS=server.1=zk1:2888:3888 server.2=zk2:2888:3888 server.3=zk3:2888:3888
    ports:
      - 2181:2181
      - 2888:2888
      - 3888:3888
    extra_hosts:
      - "zk1:192.168.31.86"
      - "zk2:192.168.31.168"
      - "zk3:192.168.31.121"
      - "kafka1:192.168.31.86"
      - "kafka2:192.168.31.168"
      - "kafka3:192.168.31.121"
      - "kafka4:192.168.31.231"
编辑step1-start-zk1.sh脚本用于方便启动。
docker-compose -f docker-compose-zk1.yaml up -d
其它zookeeper节点类似配置。
(5)编辑kafka节点对应文件
以kafka1节点为例, 编辑docker-compose-kafka1.yaml
services:
  kafka1:
    container_name: kafka1
    hostname: kafka1
    image: hyperledger/fabric-kafka:0.4.14
    restart: always
    environment:
      - KAFKA_MESSAGE_MAX_BYTES=103809024 # 99 * 1024 * 1024 B
      - KAFKA_REPLICA_FETCH_MAX_BYTES=103809024 # 99 * 1024 * 1024 B
      - KAFKA_UNCLEAN_LEADER_ELECTION_ENABLE=false
    environment:
      - KAFKA_BROKER_ID=1
      - KAFKA_MIN_INSYNC_REPLICAS=2
      - KAFKA_DEFAULT_REPLICATION_FACTOR=3
      - KAFKA_ZOOKEEPER_CONNECT=zk1:2181,zk2:2181,zk3:2181
    ports:
      - 9092:9092
    extra_hosts:
      - "zk1:192.168.31.86"
      - "zk2:192.168.31.168"
      - "zk3:192.168.31.121"
      - "kafka1:192.168.31.86"
      - "kafka2:192.168.31.168"
      - "kafka3:192.168.31.121"
      - "kafka4:192.168.31.231"
编辑启动脚本step2-start-kafka1.sh
docker-compose -f docker-compose-kafka1.yaml up -d
其它节点配置类似.
(6)配置orderer节点对应文件
以orderer1.example.com节点为例, 编辑docker-compose-orderer1.yaml 这里需要指定networks为byfn, peer节点也需要归到该网络, 因为这里前三组的orderer和peer是运行在对应一台机器。 如果不这样做, peer节点实例化链码的时候会报一些lscc timeout的错误, 可能是同一台的机器不同container的peer和orderer内部通信有问题, 或者是chaincode新起container实例通信有问题。
OSN orderer节点要和kafka节点通信, 设置好域名ip映射。
version: '2'

networks:
  byfn:

volumes:
  orderer.example.com:

services:

  orderer1.example.com:
    container_name: orderer1.example.com
    image: hyperledger/fabric-orderer:1.4.0
    environment:
      - FABRIC_LOGGING_SPEC=INFO
      - ORDERER_GENERAL_LISTENADDRESS=0.0.0.0
      - ORDERER_GENERAL_GENESISMETHOD=file
      - ORDERER_GENERAL_GENESISFILE=/var/hyperledger/orderer/orderer.genesis.block
      - ORDERER_GENERAL_LOCALMSPID=OrdererMSP
      - ORDERER_GENERAL_LOCALMSPDIR=/var/hyperledger/orderer/msp
      # enabled TLS
      - ORDERER_GENERAL_TLS_ENABLED=true
      - ORDERER_GENERAL_TLS_PRIVATEKEY=/var/hyperledger/orderer/tls/server.key
      - ORDERER_GENERAL_TLS_CERTIFICATE=/var/hyperledger/orderer/tls/server.crt
      - ORDERER_GENERAL_TLS_ROOTCAS=[/var/hyperledger/orderer/tls/ca.crt]
      - ORDERER_KAFKA_TOPIC_REPLICATIONFACTOR=1
      - ORDERER_KAFKA_RETRY_LONGINTERVAL=10s
      - ORDERER_KAFKA_RETRY_LONGTOTAL=100s
      - ORDERER_KAFKA_RETRY_SHORTINTERVAL=1s
      - ORDERER_KAFKA_RETRY_SHORTTOTAL=30s
      - ORDERER_KAFKA_VERBOSE=true
    working_dir: /opt/gopath/src/github.com/hyperledger/fabric
    command: orderer
    volumes:
      - ./channel-artifacts/genesis.block:/var/hyperledger/orderer/orderer.genesis.block
      - ./crypto-config/ordererOrganizations/example.com/orderers/orderer1.example.com/msp:/var/hyperledger/orderer/msp
      - ./crypto-config/ordererOrganizations/example.com/orderers/orderer1.example.com/tls/:/var/hyperledger/orderer/tls
      - orderer.example.com:/var/hyperledger/production/orderer
    ports:
      - 7050:7050

    extra_hosts:
      - "kafka1:192.168.31.86"
      - "kafka2:192.168.31.168"
      - "kafka3:192.168.31.121"
      - "kafka4:192.168.31.231"
    networks:
      - byfn
对应启动脚本step3-start-orderer1.sh, 其它节点类似.
(7)配置peer节点对应文件
peer节点最为关键, 编辑docker-compose-peer0-org1.yaml
Peer0不配置extra_hosts的时候, 按照first-network的例子照搬, peer节点是可以跑起来, 但是peer节点之间的通信有一些报警或错误, 按理说extra_hosts是要配置的, 不然peer0无法识别peer1和orderer节点。 但加入extra_hosts之后, peer节点启动一阵就挂了, 查看日志chaincodeListenerAddress无法绑定到192.168.31.86:7052(可能是extra_hosts映射到了ip), 有自动检测容器ip的一些日志。 配置CORE_PEER_CHAINCODELISTENADDRESS=peer0.org1.example.com:7052是不行的, 依旧域名命中转为31.86:7052端口绑定失败。 容器的ip自然不是86, 类似orderer监听的配置方法设置为0.0.0.0:7052就好了。 不过奇怪的是实际查看docker ps, 容器的7052是没暴露到宿主机器的。 老实说配置是有点多了, 官方给的例子7052都没配置过, 这些只能去跟源码才可能了解到了。
一个比较重要的配置项是CORE_VM_DOCKER_HOSTCONFIG_NETWORKMODE, 这里注意到的${COMPOSE_PROJECT_NAME}是在.env文件中配置了值为net, 漏了会出问题, 而_后跟着的byfn是对应的networks配置的值。这个配置项从注释上来看好像是让chaincode实例化时新起的容器与所在的peer节点在同一个桥接网络中。笔者的环境不这样配就无法实例化链码,也需要设置peer, orderer,cli在同一个byfn网络内。
也有可能peer节点和orderer节点单独在不同机器就不需要这样配置, 请大家尝试。
networks:
  byfn:

volumes:
  peer0.org1.example.com:
  peer1.org1.example.com:
  peer0.org2.example.com:
  peer1.org2.example.com:

services:
  peer0.org1.example.com:
    container_name: peer0.org1.example.com
    #hostname: peer0.org1.example.com
    image: hyperledger/fabric-peer:1.4.0
    environment:
       - CORE_PEER_ID=peer0.org1.example.com
       - CORE_PEER_ADDRESS=peer0.org1.example.com:7051
       - CORE_PEER_GOSSIP_BOOTSTRAP=peer1.org1.example.com:7051
       - CORE_PEER_GOSSIP_EXTERNALENDPOINT=peer0.org1.example.com:7051
       #- CORE_PEER_CHAINCODELISTENADDRESS=peer0.org1.example.com:7052
       - CORE_PEER_CHAINCODELISTENADDRESS=0.0.0.0:7052
       - CORE_PEER_LOCALMSPID=Org1MSP
       - CORE_VM_ENDPOINT=unix:///host/var/run/docker.sock
       - CORE_VM_DOCKER_HOSTCONFIG_NETWORKMODE=${COMPOSE_PROJECT_NAME}_byfn
       # the following setting starts chaincode containers on the same
       # bridge network as the peers
       # https://docs.docker.com/compose/networking/
       - CORE_LOGGING_LEVEL=INFO
       - CORE_PEER_GOSSIP_USELEADERELECTION=true
       - CORE_PEER_GOSSIP_ORGLEADER=false
       - CORE_PEER_PROFILE_ENABLED=true
       - CORE_PEER_TLS_ENABLED=true
       - CORE_PEER_TLS_CERT_FILE=/etc/hyperledger/fabric/tls/server.crt
       - CORE_PEER_TLS_KEY_FILE=/etc/hyperledger/fabric/tls/server.key
       - CORE_PEER_TLS_ROOTCERT_FILE=/etc/hyperledger/fabric/tls/ca.crt
    working_dir: /opt/gopath/src/github.com/hyperledger/fabric/peer
    command: peer node start
    volumes:
       - /var/run/:/host/var/run/
       - ./crypto-config/peerOrganizations/org1.example.com/peers/peer0.org1.example.com/msp:/etc/hyperledger/fabric/msp
       - ./crypto-config/peerOrganizations/org1.example.com/peers/peer0.org1.example.com/tls:/etc/hyperledger/fabric/tls
       - peer0.org1.example.com:/var/hyperledger/production
    ports:
      - 7051:7051
      - 7052:7052
      - 7053:7053
    extra_hosts:
      - "orderer1.example.com:192.168.31.86"
      - "orderer2.example.com:192.168.31.168"
      - "orderer3.example.com:192.168.31.121"
      - "peer0.org1.example.com:192.168.31.86"
      - "peer1.org1.example.com:192.168.31.168"
      - "peer0.org2.example.com:192.168.31.121"
      - "peer1.org2.example.com:192.168.31.231"
    networks:
      - byfn


  cli:
    container_name: cli
    image: hyperledger/fabric-tools:1.4.0
    tty: true
    stdin_open: true
    environment:
      - GOPATH=/opt/gopath
      - CORE_VM_ENDPOINT=unix:///host/var/run/docker.sock
      - CORE_LOGGING_LEVEL=INFO
      - CORE_PEER_ID=cli
      - CORE_PEER_ADDRESS=peer0.org1.example.com:7051
      - CORE_PEER_LOCALMSPID=Org1MSP
      - CORE_PEER_TLS_ENABLED=true
      - CORE_PEER_TLS_CERT_FILE=/opt/gopath/src/github.com/hyperledger/fabric/peer/crypto/peerOrganizations/org1.example.com/peers/peer0.org1.example.com/tls/server.crt
      - CORE_PEER_TLS_KEY_FILE=/opt/gopath/src/github.com/hyperledger/fabric/peer/crypto/peerOrganizations/org1.example.com/peers/peer0.org1.example.com/tls/server.key
      - CORE_PEER_TLS_ROOTCERT_FILE=/opt/gopath/src/github.com/hyperledger/fabric/peer/crypto/peerOrganizations/org1.example.com/peers/peer0.org1.example.com/tls/ca.crt
      - CORE_PEER_MSPCONFIGPATH=/opt/gopath/src/github.com/hyperledger/fabric/peer/crypto/peerOrganizations/org1.example.com/users/Admin@org1.example.com/msp
    working_dir: /opt/gopath/src/github.com/hyperledger/fabric/peer
    volumes:
        - /var/run/:/host/var/run/
        - ./chaincode/:/opt/gopath/src/github.com/chaincode
        - ./crypto-config:/opt/gopath/src/github.com/hyperledger/fabric/peer/crypto/
        - ./scripts:/opt/gopath/src/github.com/hyperledger/fabric/peer/scripts/
        - ./channel-artifacts:/opt/gopath/src/github.com/hyperledger/fabric/peer/channel-artifacts
    extra_hosts:
      - "orderer1.example.com:192.168.31.86"
      - "orderer2.example.com:192.168.31.168"
      - "orderer3.example.com:192.168.31.121"
      - "peer0.org1.example.com:192.168.31.86"
      - "peer1.org1.example.com:192.168.31.168"
      - "peer0.org2.example.com:192.168.31.121"
      - "peer1.org2.example.com:192.168.31.231"
    networks:
      - byfn
对应启动脚本step4-start-peer0-org1.sh, 其它节点类似。
(8)拷贝yaml到各节点, 其次启动节点.
scp -r *.yaml root@192.168.31.168:/mnt/sda3/fabric-samples/kafka-orderer
scp -r *.yaml root@192.168.31.121:/mnt/sda3/fabric-samples/kafka-orderer
scp -r *.yaml root@192.168.31.231:/mnt/sda3/fabric-samples/kafka-orderer
先启动三个zookeeper
192.168.31.86 ./step1-start-zk1.sh
192.168.31.168 ./step1-start-zk2.sh
192.168.31.121 ./step1-start-zk3.sh
启动四个kafka
192.168.31.86 ./step2-start-kafka1.sh
192.168.31.168 ./step2-start-kafka2.sh
192.168.31.121 ./step2-start-kafka3.sh
192.168.31.231 ./step2-start-kafka3.sh
启动三个orderer
192.168.31.86 ./step3-start-orderer1.sh
192.168.31.168 ./step3-start-orderer2.sh
192.168.31.121 ./step3-start-orderer3.sh
启动四个peer
192.168.31.86 ./step4-start-peer0-org1.sh
192.168.31.168 ./step4-start-peer1-org1.sh
192.168.31.121 ./step4-start-peer0-org2.sh
192.168.31.231 ./step4-start-peer1-org2.sh
每一步骤多看下docker进程日志.
(9)创建通道, 加入通道, 安装和调用链码
很多时候在这步才能判断出安装的问题, 没搞好很可能全部重来。
创建通道, 加入通道
192.168.31.86
#登录到容器cli
docker exec -it -e LINES=$(tput lines) -e COLUMNS=$(tput cols) cli bash
#创建通道,可能会提示SERVICE UNAVIALBLE, 但不影响
peer channel create -o orderer1.example.com:7050 -c mychannel -f ./channel-artifacts/channel.tx --tls --cafile /opt/gopath/src/github.com/hyperledger/fabric/peer/crypto/ordererOrganizations/example.com/orderers/orderer1.example.com/msp/tlscacerts/tlsca.example.com-cert.pem
#加入通道
peer channel join -b mychannel.block
#拷贝mychannel.block到其它peer
mv mychannel.block ./channel-artifacts
#退出cli
exit
scp -r channel-artifacts crypto-config root@192.168.31.168:/mnt/sda3/fabric-samples/kafka-orderer
scp -r channel-artifacts crypto-config root@192.168.31.121:/mnt/sda3/fabric-samples/kafka-orderer
scp -r channel-artifacts crypto-config root@192.168.31.231:/mnt/sda3/fabric-samples/kafka-orderer
======================================= 192.168.31.168, 192.168.121, 192.168.31.231 #进入cli, 加入通道
docker exec -it -e LINES=$(tput lines) -e COLUMNS=$(tput cols) cli bash
cd ./channel-artifacts
peer channel join -b mychannel.block
更新锚节点
192.168.31.86 #加入cli bash执行,一个组织一个节点执行即可
peer channel update -o orderer1.example.com:7050 -c mychannel -f ./channel-artifacts/Org1MSPanchors.tx --tls --cafile /opt/gopath/src/github.com/hyperledger/fabric/peer/crypto/ordererOrganizations/example.com/orderers/orderer1.example.com/msp/tlscacerts/tlsca.example.com-cert.pem
========================================== 192.168.121 #加入cli bash执行,一个组织一个节点执行即可
peer channel update -o orderer2.example.com:7050 -c mychannel -f ./channel-artifacts/Org2MSPanchors.tx --tls --cafile /opt/gopath/src/github.com/hyperledger/fabric/peer/crypto/ordererOrganizations/example.com/orderers/orderer2.example.com/msp/tlscacerts/tlsca.example.com-cert.pem
安装链码,实例化, 调用链码
192.168.31.86 #cli bash, install
peer chaincode install -n mycc -v 1.0 -p github.com/chaincode/chaincode_example02/go/
#实例化, 执行成功后到其它节点查询peer chaincode list –instantiated -C mychannel应该会有记录,但是无安装记录
peer chaincode instantiate -o orderer1.example.com:7050 --tls --cafile /opt/gopath/src/github.com/hyperledger/fabric/peer/crypto/ordererOrganizations/example.com/orderers/orderer1.example.com/msp/tlscacerts/tlsca.example.com-cert.pem -C mychannel -n mycc -v 1.0 -c '{"Args":["init","a", "100", "b","200"]}' -P "AND ('Org1MSP.peer','Org2MSP.peer')"
#链码查询,应该返回100
peer chaincode query -C mychannel -n mycc -c '{"Args":["query","a"]}'
#转账调用,a应该剩下90
peer chaincode invoke -o orderer1.example.com:7050 --tls true --cafile /opt/gopath/src/github.com/hyperledger/fabric/peer/crypto/ordererOrganizations/example.com/orderers/orderer1.example.com/msp/tlscacerts/tlsca.example.com-cert.pem -C mychannel -n mycc --peerAddresses peer0.org1.example.com:7051 --tlsRootCertFiles /opt/gopath/src/github.com/hyperledger/fabric/peer/crypto/peerOrganizations/org1.example.com/peers/peer0.org1.example.com/tls/ca.crt --peerAddresses peer0.org2.example.com:7051 --tlsRootCertFiles /opt/gopath/src/github.com/hyperledger/fabric/peer/crypto/peerOrganizations/org2.example.com/peers/peer0.org2.example.com/tls/ca.crt -c '{"Args":["invoke","a","b","10"]}'
============================== 192.168.31.168, 192.168.121, 192.168.31.231
#需要先安装链码代码
peer chaincode install -n mycc -v 1.0 -p github.com/chaincode/chaincode_example02/go/
#执行查询, 返回90
peer chaincode query -C mychannel -n mycc -c '{"Args":["query","a"]}'
3.小结
提供的代码只用于学习, 不适合用于生产。持久化配置, 记账本使用couchdb, kafka, zookeeper网络安全设置, 系统参数, 容器参数等都需要按照实际情况调整。 希望对大家有帮助
- 原文作者:Zealot
- 原文链接:https://www.51discuss.com/posts/fabric-kafka-cluster/
- 版权声明:本作品采用知识共享署名-非商业性使用-禁止演绎 4.0 国际许可协议进行许可,非商业转载请注明出处(作者,原文链接),商业转载请联系作者获得授权。
